|
<< prev | goto page
|
|
| Author | Message |
|---|---|
|
Posted: Sun Sep 18, 2005 3:00 am i'll try to get it sticky-fied. you have to be an admin to make stickies, regular mods can't do it (or i don't know how) . EDIT: nevermind i figured it out :) _________________ "Religions have started on lesser revelations" - investor on MarketWatch.com |
|
|
Joined: 01 Jul 2003 | Posts: 4403 | Location: Dallas
|
|
|
|
|
|
Posted: Sun Sep 18, 2005 4:15 am -Samara- wrote: DOWNLOAD TEMPLATES HERE!! thanks hannah http://www.orangegoldandgreen.com/template1n2.jpg http://www.orangegoldandgreen.com/template3n4.jpg NOTE: it may take a while to download. Let's start.! 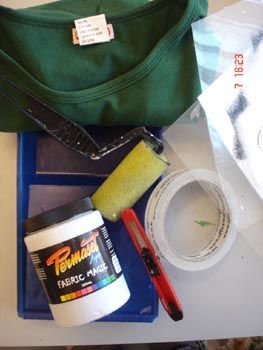
What you need. - a paint roller, you get them at your craft store for 1 buck. - A plain shirt, washed once to shrink it. - 2 A4 pieces of acetate aka overhead transparency papers. You can get them at your parent’s office or a printing store. - A small Stanley knife, or a xacto cutting knife. - White fabric paint,make sure its opaque and for dark materials. - Small paintbrush. 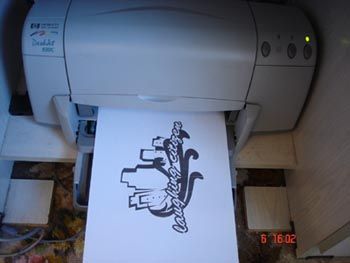
1) Print off the templates 1-4 off the forum. Cut them in half and leave aside templates 1 and 3 for later. 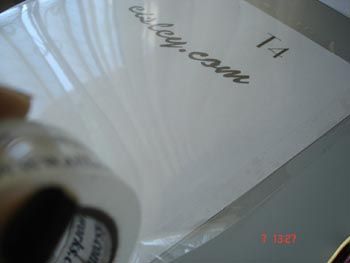
2) Place the acetate sheet, on top of template 2 and stick the 4 sides together. Do the same to template 4. 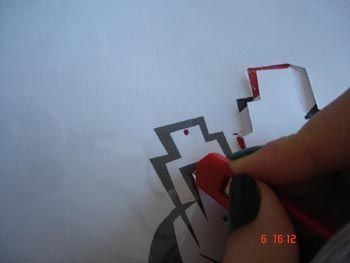
3) Now start cutting! Cut out the negative space out. aka the black area(all of it) Don’t get freaked about how much work you have to do, just take your time and work piece by piece. Make you sure you get breaks as well, the better cuts you’re doing, the better the quality of the stencil. Always be careful as most blades for knives are very sharp. Also be sure to have enough protection underneath your stencil to avoid damaging your cutting surface. 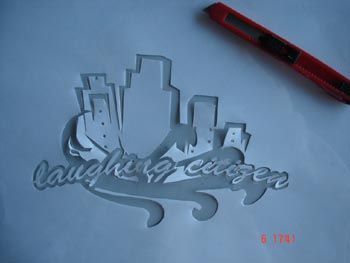
4) Now once you’ve finally cut out all the negative space, get rid of the white paper. You’re done! A stencil! 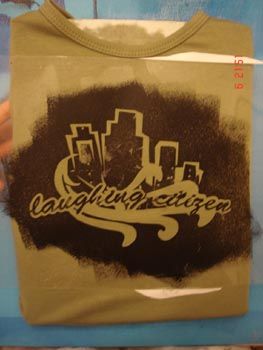
5) Okay, now the easy part. Lay down your stencil on the tee you are planning to print on. Make sure the fabric is flat, and start taping the stencil where ever you can, to keep in still. Now place a book, or a piece of cardboard in between the shirt to aid it to stretch out. (It helps the paint get in between the small gaps, esp. in girl’s ribbed tops) 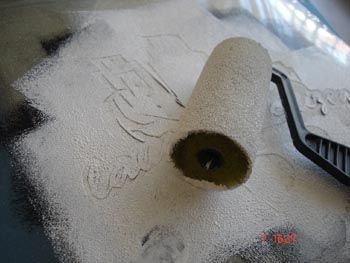
6) Pour some fabric paint on a container or dish etc; and work your roller small bit at a time. It better to have smaller coats of paint on a shirt, than big sloppy ones. (They will wreck your shirt). Apply pressure, and make sure it’s an even coat. 7) Let it dry for a minute or two, with the stencil on. And slowly peel the stencil and tape away. Be careful! It may still be wet. 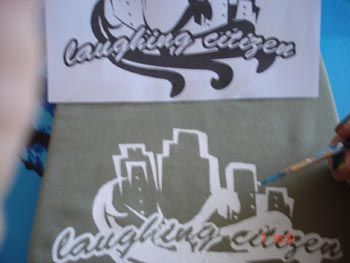
8 ) Now the tricky part, use template 1 and 3 to help you join up the bridges and fill in tiny gaps. Fill it in with some white paint and a little brush. 9) Leave it out to dry, or you can use a hairdryer to speed the process up. 10) To heat seal the shirt, get a piece of baking paper on the printed area and iron it for a minute or 2. Keep an eye on it, and avoid ironing on melt-able surfaces..(cough cough placidian !) 11) Now stencil template 4 on the back. 
12) You’re done!! Wear the eisley boarder shirt with pride. if you still have some questions, post them up here or pm me. for further inform, check : http://www.stencilrevolution.com/tutorials/tutorialsview.php?id=2 and http://www.stencilrevolution.com/tutorials/tutorialsview.php?id=7 good luck! samara p.s kudos to the igonorance motif and each and every one of you guys that bought theses ideas together! well done! i think i may be stupid, but, what's baking paper? lol. _________________ Will you marry me when you are seventy and have nothing to lose? |
|
|
Joined: 17 Sep 2005 | Posts: 220 | Location: Livingston, NJ
|
|
|
|
|
|
Posted: Sun Sep 18, 2005 11:19 am thats pretty much the most amazing and helpful series of pictures ive ever seen _________________ "and if your boy gives ya any lip you can just hit'em with a sack of Sweet Vilencia oranges, they don't leave a bruise and it lets'em know who's boss....noo doubt about it" http://www.xanga.com/private/home.aspx |
|
|
Joined: 17 Sep 2005 | Posts: 7 | Location: Searcy Arkansas
|
|
|
|
|
|
Posted: Sun Sep 18, 2005 3:07 pm photomemory wrote: -Samara- wrote: DOWNLOAD TEMPLATES HERE!! thanks hannah http://www.orangegoldandgreen.com/template1n2.jpg http://www.orangegoldandgreen.com/template3n4.jpg NOTE: it may take a while to download. Let's start.!
What you need. - a paint roller, you get them at your craft store for 1 buck. - A plain shirt, washed once to shrink it. - 2 A4 pieces of acetate aka overhead transparency papers. You can get them at your parent’s office or a printing store. - A small Stanley knife, or a xacto cutting knife. - White fabric paint,make sure its opaque and for dark materials. - Small paintbrush.
1) Print off the templates 1-4 off the forum. Cut them in half and leave aside templates 1 and 3 for later.
2) Place the acetate sheet, on top of template 2 and stick the 4 sides together. Do the same to template 4.
3) Now start cutting! Cut out the negative space out. aka the black area(all of it) Don’t get freaked about how much work you have to do, just take your time and work piece by piece. Make you sure you get breaks as well, the better cuts you’re doing, the better the quality of the stencil. Always be careful as most blades for knives are very sharp. Also be sure to have enough protection underneath your stencil to avoid damaging your cutting surface.
4) Now once you’ve finally cut out all the negative space, get rid of the white paper. You’re done! A stencil!
5) Okay, now the easy part. Lay down your stencil on the tee you are planning to print on. Make sure the fabric is flat, and start taping the stencil where ever you can, to keep in still. Now place a book, or a piece of cardboard in between the shirt to aid it to stretch out. (It helps the paint get in between the small gaps, esp. in girl’s ribbed tops)
6) Pour some fabric paint on a container or dish etc; and work your roller small bit at a time. It better to have smaller coats of paint on a shirt, than big sloppy ones. (They will wreck your shirt). Apply pressure, and make sure it’s an even coat. 7) Let it dry for a minute or two, with the stencil on. And slowly peel the stencil and tape away. Be careful! It may still be wet.
8 ) Now the tricky part, use template 1 and 3 to help you join up the bridges and fill in tiny gaps. Fill it in with some white paint and a little brush. 9) Leave it out to dry, or you can use a hairdryer to speed the process up. 10) To heat seal the shirt, get a piece of baking paper on the printed area and iron it for a minute or 2. Keep an eye on it, and avoid ironing on melt-able surfaces..(cough cough placidian !) 11) Now stencil template 4 on the back.
12) You’re done!! Wear the eisley boarder shirt with pride. if you still have some questions, post them up here or pm me. for further inform, check : http://www.stencilrevolution.com/tutorials/tutorialsview.php?id=2 and http://www.stencilrevolution.com/tutorials/tutorialsview.php?id=7 good luck! samara p.s kudos to the igonorance motif and each and every one of you guys that bought theses ideas together! well done! i think i may be stupid, but, what's baking paper? lol. prolly wax paper? _________________ 
|
|
|
Joined: 04 Aug 2005 | Posts: 158 | Location: Capatown
|
|
|
|
|
|
Posted: Mon Sep 19, 2005 3:10 pm perhaps..... i'm totally going to start stenciling stuff now. haha. it's so easy once you get the hang of it right? so excited!!!! _________________ Will you marry me when you are seventy and have nothing to lose? |
|
|
Joined: 17 Sep 2005 | Posts: 220 | Location: Livingston, NJ
|
|
|
|
|
|
Posted: Tue Sep 20, 2005 4:09 am >.> Where can I get meh hands on that stencil? I might just do as this thread says and make it myself. My bro-in-law has screen printing stuff, so im not worried about making the shirt, just cutting the stencil perfectly! _________________ Weston wrote: i spit out a flury of rude language at garron like, "UGH!....DUMMY!" he flips out and crys for the next couple of hours, then we stop at subway my favorite restaurant and buy him a sub and things are cool now. You will be greatly missed Jonathon David Wilson. Great bassist, great guy. *caution* *Myspace-caution* |
|
|
Joined: 25 Jan 2005 | Posts: 931 | Location: Where I currently am.
|
|
|
|
|
|
Posted: Mon Oct 17, 2005 3:45 pm Well, I must say this t-shirt stencil idea inspired me! I didn't make an eisley boarder shirt, but I thought I might include it in this thread anyway. The shirt was made for my roomie's birthday..and seeing as her favorite band is carbon leaf I made a tee with a leaf...that actually looks like a ghost. we call him leafy! 
This one was kinda rough, and I definitely learned from my mistakes, but the next endeavor is to make an eisley tee! |
|
|
Joined: 05 Oct 2005 | Posts: 60 | Location: Phx,AZ/C-ville,VA
|
|
|
|
|
|
Posted: Mon Oct 17, 2005 4:33 pm I just bought a silkscreening kit and did my first run today and I must say its really fun and its pretty darn easy. So with that being said, my next project shall be this here tee. _________________ http://www.nicholasvenaglia.com |
|
|
Joined: 18 Jan 2004 | Posts: 1537 | Location: San Francisco
|
|
|
|
|
|
Posted: Sat Feb 04, 2006 7:06 am I'D USE THE LAUGHING CITY ONE, but ogg doesnt worrrrrrrrkkkkkkkkkkkk _________________ pretend this is the best signature ever |
|
|
Joined: 27 Aug 2005 | Posts: 733 | Location: where I live
|
|
|
|
|
|
|
|
|
Laughing City Forum Index -> eisleyBlog -> A STENCILING TUTORIAL!(with pictures)
Page 5 of 5 << prev | goto page
|
|
|
You cannot post new topics in this forum
You cannot reply to topics in this forum You cannot edit your posts in this forum You cannot delete your posts in this forum You cannot vote in polls in this forum |
|
|
All times are GMT - 12 Hours
|
|